Audio effect nodes

Audio effect nodes process live PCM audio in the graph — gain, EQ, dynamics, filters, delay, reverb, and stereo widening. They sit on the yellow audio stream between a source (clip audio or Mic Input) and wherever that sound is headed (Audio Output, Audio Mixer, or a shader's audio-in).
Effects run in real time through FFmpeg's audio filter engine at 44.1 kHz stereo float. Chain as many nodes as you need; audio passes through them in wire order, upstream → downstream.
Adding an effect

Right‑click the empty canvas → Add Audio Effect Node → pick an effect:
- Gain
- High-Pass Filter
- Low-Pass Filter
- 3-Band EQ
- Compressor
- Limiter
- Noise Gate
- Delay / Echo
- Reverb
- Stereo Widen
Ports and wiring
Each audio effect node has:
- one yellow input on the left (Audio In)
- one yellow output on the right (Audio Out)
Valid connections use the same yellow wires as clip audio:
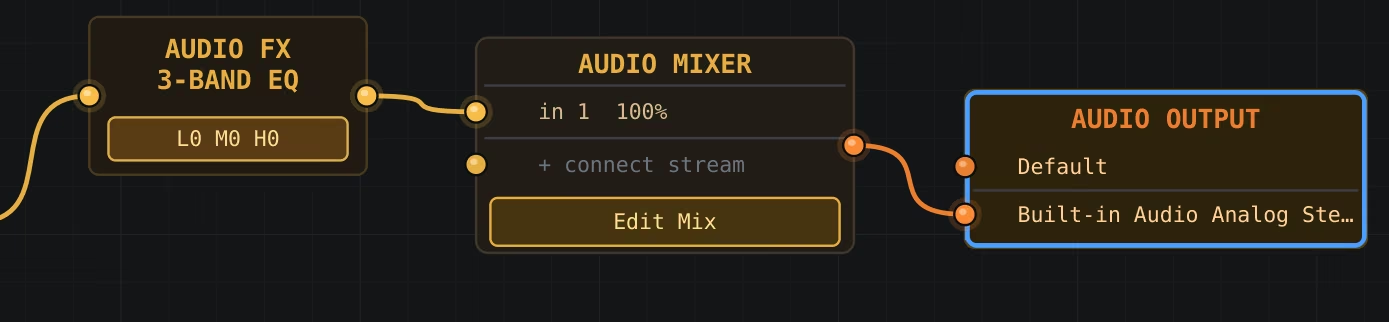
You can insert effects anywhere on an audio stream before it reaches an Audio Output device port, Audio Mixer, or shader audio-in port. Wire out → in to chain multiple effects.
Editing an effect
Click the Edit button on the node (or right‑click → Edit …) to open its settings dialog.
Every effect uses dial + LCD readout controls:
- Single‑knob effects (Gain, High/Low Pass, Stereo Widen) show one large dial with a numeric LCD above it.
- Multi‑parameter effects show a row (or grid) of smaller labelled dials, each with its own LCD.
While the dialog is open, changes preview live on the running audio stream. Click OK to keep the settings, or Cancel to revert to what you had before opening the dialog.
Each effect also has a Bypass checkbox. When bypassed, that node is skipped when the filter chain is built — useful for A/B comparisons without deleting the node.
The node's face shows a short summary of the current settings (for example
80 Hz on a high-pass, or L0 M+3 H-2 on the EQ).
Available effects
Gain
Adjust overall level.
| Control | Range | Notes |
|---|---|---|
| Gain | −24 to +24 dB | 0.5 dB steps |
High-Pass Filter
Removes low frequencies below the cutoff — useful for rumble, mic handling noise, or tightening a mix.
| Control | Range | Notes |
|---|---|---|
| Cutoff | 20 Hz – 20 kHz | Log-scaled dial for precise low-end control |
Low-Pass Filter
Removes high frequencies above the cutoff — softens harsh sources or creates a "distant" sound.
| Control | Range | Notes |
|---|---|---|
| Cutoff | 20 Hz – 20 kHz | Log-scaled dial |
3-Band EQ
Three fixed bands applied in series:
| Band | Frequency | Control | Range |
|---|---|---|---|
| Low | 120 Hz | Gain | −12 to +12 dB |
| Mid | 1 kHz | Gain | −12 to +12 dB |
| High | 8 kHz | Gain | −12 to +12 dB |
Compressor
Reduces dynamic range — loud parts are pulled down relative to quiet parts.
| Control | Range | Notes |
|---|---|---|
| Threshold | −40 to 0 dB | Level where compression begins |
| Ratio | 1:1 to 20:1 | Amount of gain reduction |
| Attack | 1–200 ms | How fast the compressor reacts |
| Release | 10–2000 ms | How fast gain recovers |
Limiter
A brick-wall style ceiling to prevent clipping on the output.
| Control | Range | Notes |
|---|---|---|
| Ceiling | 0.50 – 1.00 | Maximum output level |
| Attack | 1–50 ms | |
| Release | 10–500 ms |
Noise Gate
Silences the signal when it falls below a threshold — cuts room noise between spoken phrases.
| Control | Range | Notes |
|---|---|---|
| Threshold | −60 to 0 dB | |
| Ratio | 1:1 to 10:1 | |
| Attack | 1–200 ms | |
| Release | 10–2000 ms |
Delay / Echo
Single-tap echo with feedback and wet/dry mix.
| Control | Range | Notes |
|---|---|---|
| Delay | 20–2000 ms | Echo time |
| Feedback | 0.00–0.95 | How much echo feeds back |
| Mix | 0.00–1.00 | Wet vs dry balance |
Reverb
A short multi-tap ambience built from staggered echoes (not a full algorithmic reverb, but good for room sense on speech and music).
| Control | Range | Notes |
|---|---|---|
| Room | 0.00–1.00 | Perceived space size |
| Mix | 0.00–1.00 | Wet vs dry balance |
Stereo Widen
Expands or narrows the stereo image.
| Control | Range | Notes |
|---|---|---|
| Width | 0.5× – 4.0× | 1.0 = unchanged; higher = wider |
Example chains
Polish a clip before the PA:
Media File (audio port) → High-Pass → Compressor → Gain → Audio Output
Commentary mic with gate and limiter:
Mic Input → Noise Gate → Compressor → Limiter → Audio Output
Music bed with space:
Media File (audio port) → Low-Pass → Reverb → Audio Output
Reactive shader driven from a shaped feed:
Media File (audio port) → High-Pass → Compressor → Shader audio-in
Tips
- Put filters and EQ before dynamics (compressor/limiter/gate) so the detector sees a cleaned-up signal.
- Use Bypass on individual nodes to compare before/after without rewiring.
- Heavy chains (multiple dynamics + delay/reverb) add latency inside the filter graph; keep an eye on lip-sync if the same source is also on video — adjust Audio Delay on the clip if needed (see Audio nodes).
- Effect settings are saved with your session graph and restored on load.